Add Comments to Word Documents using C# .NET
Annotating a document is an essential part of collaboration and communication in many industries. It allows users to provide feedback, suggestions, and comments on a document that can be easily shared with others. Albeit, Microsoft Word offers several annotation tools, such as comments, track changes, and adding notes, to help users provide feedback and collaborate on a document. However, in this blog post, we will explore how to annotate a Word documents using .NET Cloud SDK, making it easier for users to communicate and collaborate on documents.
- REST API to Add Word Comments
- Add Word Document Annotation using C#
- Add Comments to Word Document using cURL Commands
REST API to Add Word Comments
Using Aspose.Words Cloud SDK for .NET, you can easily add comments, replies, and annotations to a Word document programmatically using C# language. The SDK provides a comprehensive set of REST APIs for Word document manipulation and supports all major document formats, including DOC, DOCX, RTF, and more. Now with the help of this SDK, you can enhance your workflow and collaboration process by easily and efficiently add annotations, comments, and other review elements to your Word documents.
In order to use the SDK, search Aspose.Words-Cloud in NuGet packages manager and click the Add Package button to add the SDK reference in .NET project.
Note: to access the REST API, you need to register and get your personal credentials. Please take a look over Quick Start guide for related information.
Add Word Document Annotation using C#
Please try using the following code snippet to add Word document Annotation using .NET Cloud SDK.
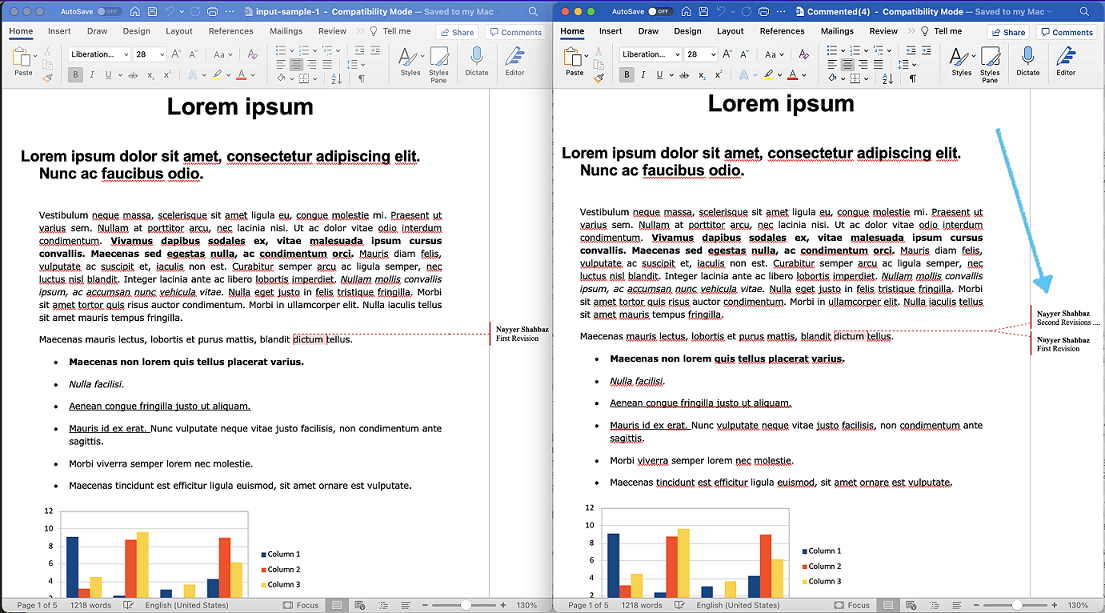
Image:- Preview of Word document annotation using REST API.
// create configuration object using ClientID and Client Secret details
var config = new Configuration { ClientId = clientID, ClientSecret = clientSecret };
// initialize WordsApi instance
var wordsApi = new WordsApi(config);
Create an object of WordsApi while using personalized client credentials.
var firstFile = System.IO.File.OpenRead(firstDocument);
Read the content of input Word document from local drive.
var requestCommentRangeStartNode = new NodeLink()
{
    NodeId = "0.6.5.3"
};
Create an object of NodeLink defining NodeId for Annotation. Repeat this process for CommentRangeStartNode and CommentRangeEndNode instances.
var requestComment = new CommentInsert()
{
    RangeStart = requestCommentRangeStart,
    RangeEnd = requestCommentRangeEnd,
    Initial = "NS",
    Author = "Nayyer Shahbaz",
    Text = "Second Revisions..."
};
Create an instance of CommentInsert where we specify the details like initials, name of Author and, the content of comment/annotation.
var insertRequest = new InsertCommentOnlineRequest(firstFile, requestComment, destFileName: "Commented.docx");
Now create an object of InsertCommentOnlineRequest where we pass the content of input Word document, CommentInsert object and the name for resultant Word document.
var response = wordsApi.InsertCommentOnline(insertRequest);
Finally, call the InsertCommentOnline(…) method to insert a comment in a Word document at the specified node.
The sample files used in the above example can be downloaded from input-sample-1.docx and Commented.docx.
Add Comments to Word Document using cURL Commands
We understand that adding annotations or comments to Word documents using cURL commands can be highly beneficial, as it provides a programmatic way to add annotations in bulk or enables you to integrate the functionality into your existing workflows. With the help of Aspose.Words Cloud API and cURL commands, adding comments to a Word document can be accomplished through a series of API calls. This involves sending requests to the Aspose.Words Cloud API with appropriate parameters, such as the document file, location, text, and author information, to create a comment.
The first step is to obtain an accessToken by sending a POST request with your App SID and App Key details. Please execute the following command:
curl -v "https://api.aspose.cloud/connect/token" \
 -X POST \
 -d "grant_type=client_credentials&client_id=ee170169-ca49-49a4-87b7-0e2ff815ea6e&client_secret=7f098199230fc5f2175d494d48f2077c" \
 -H "Content-Type: application/x-www-form-urlencoded" \
 -H "Accept: application/json"
Once we have the accessToken, please execute the following command to inset an annotation to the Word document.
curl -v "https://api.aspose.cloud/v4.0/words/{inputWordFile}/comments?destFileName={resultantFile}&revisionAuthor=Nayyer%20Shahbaz" \
-X POST \
-H  "accept: application/json" \
-H  "Authorization: Bearer {accessToken}" \
-H  "Content-Type: application/json" \
-d "{  \"RangeStart\": {    \"Node\": {      \"link\": {        \"Href\":\"https://api.aspose.cloud/v4.0/words/input-sample-1.docx/sections/0/body/paragraphs/5/runs/2\",        \"Rel\": \"self\"      },      \"NodeId\": \"0.6.5.3\",\"Text\": \"dictum\",    },    \"Offset\": 0  },  \"RangeEnd\": {    \"Node\": {      \"link\": {        \"Href\": \"https://api.aspose.cloud/v4.0/words/input-sample-1.docx/sections/0/body/paragraphs/5/runs/2\",        \"Rel\": \"self\",      },      \"NodeId\": \"0.6.5.3\",\"Text\": \"dictum\",    },    \"Offset\": 0  },  \"Author\": \"Nayyer Shahbaz\",  \"Initial\": \"NS\",  \"DateTime\": \"2023-04-28T12:52:50.108Z\",  \"Text\": \"Second Revisions ....\"}"
Replace
{inputWordFile}with the name of input Word document (already available in the Cloud storage),{accessToken}with JWT access token generated above and{resultantFile}with the name of resultant Word document containing new Annotation.
Conclusion
In conclusion, adding annotations and comments to Word documents can be a useful feature for collaborative editing and review. With the help of Aspose.Words Cloud and cURL commands or the Aspose.Words Cloud SDK for .NET, this task can be accomplished efficiently and effectively. Whether you prefer to use the cloud-based solution or the SDK, Aspose.Words provides a powerful and reliable tool for annotating the Word documents. We hope this tutorial has been helpful in guiding you through the process and has provided you with all the necessary details to get started.
Useful Links
Related Articles
We highly recommend going through the following blogs: