將 HTML 轉換為 XPS
超文本標記語言 (HTML) 是一種用於創建網頁的標準標記語言。它允許使用 HTML 元素/標籤創建和構建部分、段落和鏈接。如果在 HTML 文件中使用了某些自定義字體或引用了任何需要與源計算機/服務器建立活動連接的動態對象,則可能會損害文檔的保真度。另一方面,在 XML 紙張規範 (XPS) 中,頁面元素的定義獨立於特定的操作系統、打印機或查看應用程序。因此,一種明智的方法是將 HTML 轉換為 XPS 格式。
HTML 轉換 API
Aspose.HTML Cloud SDK for Java 是一種基於 REST 架構的輕量級 API,提供創建、操作 HTML 文件並將其轉換為 PDF、DOCX、TIFF、[JPEG] 的功能]6等,還支持HTML到XPS的轉換。因此,首先,我們需要在 Maven 構建類型項目的 pom.xml 中添加以下詳細信息,以將 SDK 包含在我們的 Java 項目中。
<repositories>
    <repository>
        <id>aspose-cloud</id>
        <name>artifact.aspose-cloud-releases</name>
        <url>https://artifact.aspose.cloud/repo</url>
    </repository>
</repositories>

<dependencies>
    <dependency>
        <groupId>com.aspose</groupId>
	<artifactId>aspose-html-cloud</artifactId>
	<version>20.7.0</version>
	<scope>compile</scope>
    </dependency>
</dependencies>
安裝後,下一步是使用 GitHub 或 Google 帳戶通過 Aspose.Cloud dashboard 免費訂閱我們的雲服務。或者,只需 創建一個新帳戶 並獲取您的客戶憑證詳細信息。
在 Java 中將 HTML 轉換為 XPS
請按照下面指定的說明開發 HTML 到 XPS 轉換器。
- 首先,我們需要針對 Configuration.setAPPSID 和 Configuration.setAPIKEY 方法指定詳細信息
- 其次,我們設置 setBasePath(..)、setAuthPath(..) 的細節並指定 setUserAgent(…) 作為 WebKit
- 第三,為了我們自己的幫助,我們將設置 setDebug(..) 為 true
- 現在創建一個 ConversionApi 類的對象
- 為結果文件的信息指定邊距詳細信息和名稱
- 最後,調用 GetConvertDocumentToXps(…) 方法,該方法需要輸入 HTML 名稱、尺寸和邊距詳細信息作為參數
// 有關更多示例,請訪問 https://github.com/aspose-html-cloud/aspose-html-cloud-java

try
    {
    // 從 https://dashboard.aspose.cloud/ 獲取 ClientID 和 ClientSecret
    String clientId = "bbf94a2c-6d7e-4020-b4d2-b9809741374e";
    String clientSecret = "1c9379bb7d701c26cc87e741a29987bb";

    // Api 調用的詳細信息
    com.aspose.html.Configuration.setAPP_SID(clientId);
    com.aspose.html.Configuration.setAPI_KEY(clientSecret);
    com.aspose.html.Configuration.setBasePath("https://api.aspose.cloud/v3.0");
    com.aspose.html.Configuration.setAuthPath("https://api.aspose.cloud/connect/token");
    com.aspose.html.Configuration.setUserAgent("WebKit");
    com.aspose.html.Configuration.setDebug(true);

    // 創建 Aspose.HTML Cloud API 對象
    com.aspose.html.api.ConversionApi htmlApi = new ApiClient().createService(ConversionApi.class);

    // 來自云存儲的 html 文件
    String name = "list.html";
    // 生成的圖像格式
    String outFormat = "PNG";

    Integer width = 800; // Resulting image width.
    Integer height = 1000; // Resulting image height.
    Integer leftMargin = 10; // Left resulting image margin.
    Integer rightMargin = 10; // Right resulting image margin.
    Integer topMargin = 10; // Top resulting image margin.
    Integer bottomMargin = 10; // Bottom resulting image margin.
    Integer resolution = 300; // Resolution of resulting image.
    String folder = null; // The folder in the storage. Should exist.
    String storage = "Internal"; // Name of the storage. null

    // 調用用於 HTML 到 XPS 轉換的 API
    retrofit2.Call<okhttp3.ResponseBody> call = htmlApi.GetConvertDocumentToXps(name, width, height, leftMargin, rightMargin, topMargin, bottomMargin, folder, storage);

    System.out.println("HTML to XPS conversion sucessfull !");
    }catch(Exception ex)
    {
        System.out.println(ex);
    }
上面的代碼在響應流中返回結果,為了將輸出保存在本地驅動器上,我們可以考慮使用以下自定義方法。
/*
* 以 ResponseBody 和生成的文件名作為參數的方法
*/
public static void checkAndSave(retrofit2.Call<okhttp3.ResponseBody> call, String fileName) throws IOException
	{
	    // 同步發送請求並返回其響應。
	    retrofit2.Response<okhttp3.ResponseBody> res = call.execute();

	    // 成功響應的反序列化響應體
	    okhttp3.ResponseBody answer = res.body();

	    //保存到測試目錄
	    boolean result = saveToDisc(answer, fileName);

	    // 驗證結果值是否為真(可選步驟)
	    Assert.assertTrue(result);
	}

  /*
  *
  * 調用此方法將響應內容保存為本地驅動器上的文件
  *
  */
	public static boolean saveToDisc(okhttp3.ResponseBody body, String fileName)
	{
            // 創建文件對象指示結果文件的位置
	    File savedFile = new File("c:\\Downloads\\"+fileName);

	    try (InputStream inputStream = body.byteStream();
	    OutputStream outputStream = new FileOutputStream(savedFile))
	    {
	    byte[] fileReader = new byte[4096];
	    long fileSizeDownloaded = 0;

	    while (true) {
	        int read = inputStream.read(fileReader);
		if (read == -1) break;

                // 將文件流保存到本地驅動器
		outputStream.write(fileReader, 0, read);
		fileSizeDownloaded += read;
            }
	    // 清除輸出流實例
	    outputStream.flush();

	    // 文件保存成功返回true
	    return true;
	    } catch (Exception e) {
		e.printStackTrace();
		return false;
	    }
	} // saveToDisc ends here
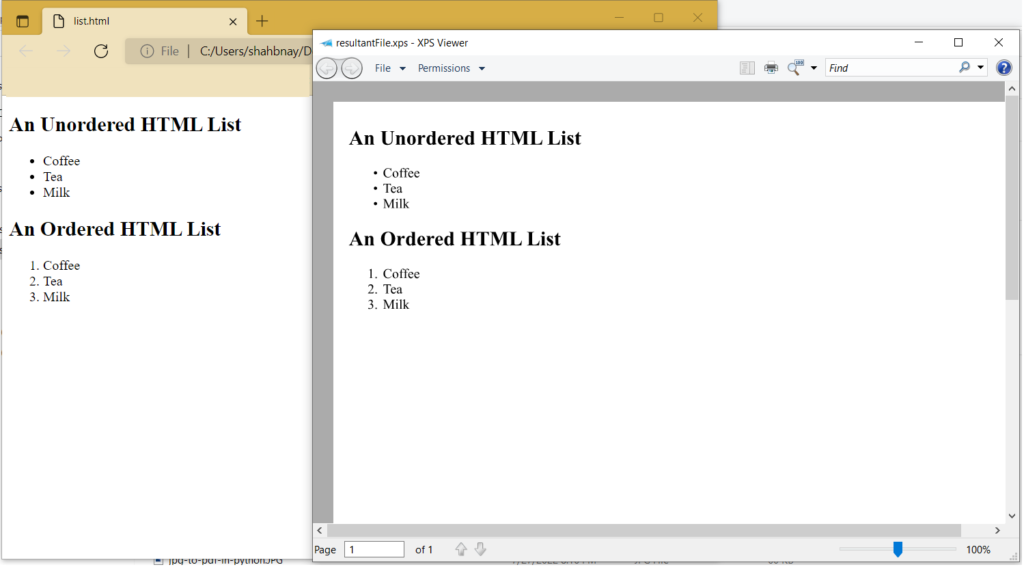
Image1:- HTML 到 XPS 預覽
上例中使用的示例文件可以從 list.html 和 resultantFile.xps 下載。
使用 cURL 命令將 HTML 轉換為 XPS
REST API 也可以通過 cURL 命令訪問,因此在本節中,我們將學習如何使用 cURL 命令執行 HTML 到 XPS 轉換的步驟。現在作為先決條件,我們需要首先根據您的個人客戶端憑據生成一個 JSON Web 令牌 (JWT)。請執行以下命令生成 JWT 令牌。
curl -v "https://api.aspose.cloud/connect/token" \
-X POST \
-d "grant_type=client_credentials&client_id=bbf94a2c-6d7e-4020-b4d2-b9809741374e&client_secret=1c9379bb7d701c26cc87e741a29987bb" \
-H "Content-Type: application/x-www-form-urlencoded" \
-H "Accept: application/json"
現在我們有了 JWT 令牌,請在終端執行以下命令來執行 HTML 到 XPS 的轉換。
curl -v -X GET "https://api.aspose.cloud/html/list.html/convert/xps" \
-H  "accept: multipart/form-data" \
-H  "authorization: Bearer <JWT Token>" \
-o final.xps
結論
本文詳細介紹了使用 REST API 將 HTML 轉換為 XPS。我們已經學習了使用 Java 代碼片段以及通過 cURL 命令將 HTML 轉換為 XPS 的步驟。此外,請注意產品 文檔 是學習 API 提供的驚人功能的重要來源。此外,如果您在使用 API 時遇到任何問題,請隨時聯繫免費產品支持論壇。
相關文章
我們還建議訪問以下博客以獲取有關以下內容的更多詳細信息: