HTML을 XPS로 변환
HyperText Markup Language(HTML)는 웹 페이지 생성을 위한 표준 마크업 언어입니다. HTML 요소/태그를 사용하여 섹션, 단락 및 링크의 생성 및 구조를 허용합니다. 그리고 HTML 파일에 일부 사용자 지정 글꼴이 사용되거나 소스 시스템/서버에 대한 활성 연결이 필요한 동적 개체가 참조되는 경우 문서의 충실도가 손상될 가능성이 있습니다. 반면에 XML Paper Specification(XPS)에서는 페이지 요소가 특정 운영 체제, 프린터 또는 보기 응용 프로그램과 독립적으로 정의됩니다. 따라서 지능적인 접근 방식은 HTML을 XPS 형식으로 변환하는 것입니다.
HTML 변환 API
Aspose.HTML Cloud SDK for Java는 HTML 파일을 PDF, DOCX, TIFF, [JPEG]로 생성, 조작 및 변환하는 기능을 제공하는 경량 REST 아키텍처 기반 API입니다. ]6 등 HTML에서 XPS로의 변환도 지원합니다. 따라서 먼저 Maven 빌드 유형 프로젝트의 pom.xml에 다음 세부 정보를 추가하여 Java 프로젝트에 SDK를 포함해야 합니다.
<repositories>
    <repository>
        <id>aspose-cloud</id>
        <name>artifact.aspose-cloud-releases</name>
        <url>https://artifact.aspose.cloud/repo</url>
    </repository>
</repositories>

<dependencies>
    <dependency>
        <groupId>com.aspose</groupId>
	<artifactId>aspose-html-cloud</artifactId>
	<version>20.7.0</version>
	<scope>compile</scope>
    </dependency>
</dependencies>
설치 후 다음 단계는 GitHub 또는 Google 계정을 사용하여 Aspose.Cloud 대시보드를 통해 클라우드 서비스에 무료로 가입하는 것입니다. 또는 단순히 새 계정을 생성하고 클라이언트 자격 증명 세부 정보를 얻습니다.
Java에서 HTML을 XPS로 변환
HTML-XPS 변환기를 개발하려면 아래에 지정된 지침을 따르십시오.
- 먼저 Configuration.setAPPSID 및 Configuration.setAPIKEY 메서드에 대한 세부 정보를 지정해야 합니다.
- 둘째, setBasePath(..), setAuthPath(..)에 대한 세부 정보를 설정하고 setUserAgent(…)를 WebKit으로 지정합니다.
- 셋째, 우리 자신의 도움을 위해 setDebug(..)를 true로 설정합니다.
- 이제 ConversionApi 클래스의 개체를 만듭니다.
- 결과 파일에 대한 정보의 여백 세부 정보 및 이름을 지정하십시오.
- 마지막으로 GetConvertDocumentToXps(…) 메서드를 호출하여 HTML 이름, 치수 및 여백 세부 정보를 인수로 입력해야 합니다.
// 더 많은 예제를 보려면 https://github.com/aspose-html-cloud/aspose-html-cloud-java를 방문하십시오.

try
    {
    // https://dashboard.aspose.cloud/에서 ClientID 및 ClientSecret 가져오기
    String clientId = "bbf94a2c-6d7e-4020-b4d2-b9809741374e";
    String clientSecret = "1c9379bb7d701c26cc87e741a29987bb";

    // API 호출에 대한 세부 정보
    com.aspose.html.Configuration.setAPP_SID(clientId);
    com.aspose.html.Configuration.setAPI_KEY(clientSecret);
    com.aspose.html.Configuration.setBasePath("https://api.aspose.cloud/v3.0");
    com.aspose.html.Configuration.setAuthPath("https://api.aspose.cloud/connect/token");
    com.aspose.html.Configuration.setUserAgent("WebKit");
    com.aspose.html.Configuration.setDebug(true);

    // Aspose.HTML Cloud API 객체 생성
    com.aspose.html.api.ConversionApi htmlApi = new ApiClient().createService(ConversionApi.class);

    // 클라우드 저장소의 html 문서
    String name = "list.html";
    // 결과 이미지 형식
    String outFormat = "PNG";

    Integer width = 800; // Resulting image width.
    Integer height = 1000; // Resulting image height.
    Integer leftMargin = 10; // Left resulting image margin.
    Integer rightMargin = 10; // Right resulting image margin.
    Integer topMargin = 10; // Top resulting image margin.
    Integer bottomMargin = 10; // Bottom resulting image margin.
    Integer resolution = 300; // Resolution of resulting image.
    String folder = null; // The folder in the storage. Should exist.
    String storage = "Internal"; // Name of the storage. null

    // HTML에서 XPS로의 변환을 위한 API 호출
    retrofit2.Call<okhttp3.ResponseBody> call = htmlApi.GetConvertDocumentToXps(name, width, height, leftMargin, rightMargin, topMargin, bottomMargin, folder, storage);

    System.out.println("HTML to XPS conversion sucessfull !");
    }catch(Exception ex)
    {
        System.out.println(ex);
    }
위의 코드는 응답 스트림에 결과를 반환하므로 출력을 로컬 드라이브에 저장하기 위해 다음 사용자 지정 방법을 사용할 수 있습니다.
/*
* ResponseBody 및 결과 파일 이름을 인수로 사용하는 메서드
*/
public static void checkAndSave(retrofit2.Call<okhttp3.ResponseBody> call, String fileName) throws IOException
	{
	    // 동기적으로 요청을 보내고 응답을 반환합니다.
	    retrofit2.Response<okhttp3.ResponseBody> res = call.execute();

	    // 성공적인 응답의 역직렬화된 응답 본문
	    okhttp3.ResponseBody answer = res.body();

	    //테스트 디렉토리에 저장
	    boolean result = saveToDisc(answer, fileName);

	    // 결과 값이 true인지 검증(선택적 단계)
	    Assert.assertTrue(result);
	}

  /*
  *
  * 응답 내용을 로컬 드라이브에 파일로 저장하려면 이 메소드를 호출하십시오.
  *
  */
	public static boolean saveToDisc(okhttp3.ResponseBody body, String fileName)
	{
            // 결과 파일의 위치를 나타내는 파일 객체 생성
	    File savedFile = new File("c:\\Downloads\\"+fileName);

	    try (InputStream inputStream = body.byteStream();
	    OutputStream outputStream = new FileOutputStream(savedFile))
	    {
	    byte[] fileReader = new byte[4096];
	    long fileSizeDownloaded = 0;

	    while (true) {
	        int read = inputStream.read(fileReader);
		if (read == -1) break;

                // 파일 스트림을 로컬 드라이브에 저장
		outputStream.write(fileReader, 0, read);
		fileSizeDownloaded += read;
            }
	    // 출력 스트림 인스턴스 지우기
	    outputStream.flush();

	    // 파일이 성공적으로 저장되면 true를 반환합니다.
	    return true;
	    } catch (Exception e) {
		e.printStackTrace();
		return false;
	    }
	} // saveToDisc ends here
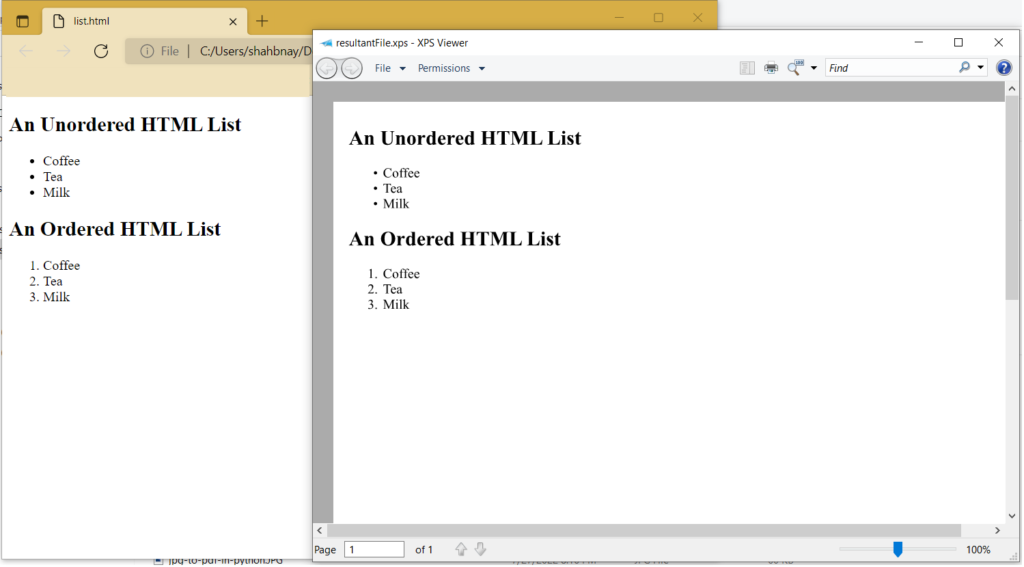
Image1:- HTML에서 XPS로 미리보기
위 예제에서 사용된 샘플 파일은 list.html 및 resultantFile.xps에서 다운로드할 수 있습니다.
cURL 명령을 사용하여 HTML에서 XPS로
REST API는 cURL 명령을 통해 액세스할 수도 있으므로 이 섹션에서는 cURL 명령을 사용하여 HTML을 XPS로 변환하는 방법에 대한 단계를 학습합니다. 이제 전제 조건으로 먼저 개별 클라이언트 자격 증명을 기반으로 JWT(JSON Web Token)를 생성해야 합니다. 다음 명령을 실행하여 JWT 토큰을 생성하십시오.
curl -v "https://api.aspose.cloud/connect/token" \
-X POST \
-d "grant_type=client_credentials&client_id=bbf94a2c-6d7e-4020-b4d2-b9809741374e&client_secret=1c9379bb7d701c26cc87e741a29987bb" \
-H "Content-Type: application/x-www-form-urlencoded" \
-H "Accept: application/json"
이제 JWT 토큰이 있으므로 터미널에서 다음 명령을 실행하여 HTML을 XPS로 변환하십시오.
curl -v -X GET "https://api.aspose.cloud/html/list.html/convert/xps" \
-H  "accept: multipart/form-data" \
-H  "authorization: Bearer <JWT Token>" \
-o final.xps
결론
이 문서에서는 REST API를 사용하여 HTML을 XPS로 변환하는 방법에 대해 자세히 설명했습니다. Java 코드 스니펫과 cURL 명령을 사용하여 HTML을 XPS로 변환하는 단계를 배웠습니다. 또한 제품 문서는 API가 제공하는 놀라운 기능을 학습할 수 있는 훌륭한 소스입니다. 또한 API 사용 중 문제가 발생하면 무료 제품 지원 포럼으로 언제든지 문의하시기 바랍니다.
관련 기사
또한 다음 블로그를 방문하여 자세한 내용을 확인하는 것이 좋습니다.