
HTML を XPS に変換する
HyperText Markup Language (HTML) は、Web ページ作成用の標準マークアップ言語です。 HTML 要素/タグを使用して、セクション、段落、およびリンクを作成および構造化できます。また、HTML ファイルでカスタム フォントが使用されている場合や、ソース マシン/サーバーへのアクティブな接続が必要な動的オブジェクトが参照されている場合、ドキュメントの忠実度が損なわれる可能性があります。一方、XML Paper Specification (XPS) では、ページ要素は、特定のオペレーティング システム、プリンター、または表示アプリケーションとは無関係に定義されます。したがって、賢明なアプローチは、HTML を XPS 形式に変換することです。
HTML 変換 API
Aspose.HTML Cloud SDK for Java は軽量な REST アーキテクチャ ベースの API で、HTML ファイルを PDF、DOCX、TIFF、[JPEG] に作成、操作、変換する機能を提供します。 ]6など、HTMLからXPSへの変換にも対応しています。そのため、まず、Java プロジェクトに SDK を含めるために、Maven ビルド タイプ プロジェクトの pom.xml に次の詳細を追加する必要があります。
<repositories>
    <repository>
        <id>aspose-cloud</id>
        <name>artifact.aspose-cloud-releases</name>
        <url>https://artifact.aspose.cloud/repo</url>
    </repository>
</repositories>

<dependencies>
    <dependency>
        <groupId>com.aspose</groupId>
	<artifactId>aspose-html-cloud</artifactId>
	<version>20.7.0</version>
	<scope>compile</scope>
    </dependency>
</dependencies>
インストール後の次のステップは、GitHub または Google アカウントを使用して Aspose.Cloud ダッシュボード 経由で当社のクラウド サービスに無料で登録することです。または、単に 新しいアカウントを作成 して、クライアント資格情報の詳細を取得します。
Java で HTML を XPS に変換する
HTML から XPS へのコンバーターを開発するには、以下の手順に従ってください。
- まず、Configuration.setAPPSID および Configuration.setAPIKEY メソッドに対して詳細を指定する必要があります。
- 次に、setBasePath(..)、setAuthPath(..) の詳細を設定し、setUserAgent(…) を WebKit として指定します。
- 3 番目に、私たち自身の支援のために、setDebug(..) を true に設定します。
- 次に、ConversionApi クラスのオブジェクトを作成します
- 結果ファイルの情報の余白の詳細と名前を指定します
- 最後に、GetConvertDocumentToXps(…) メソッドを呼び出します。このメソッドには、入力 HTML 名、寸法、余白の詳細が引数として必要です。
// その他の例については、https://github.com/aspose-html-cloud/aspose-html-cloud-java にアクセスしてください。

try
    {
    // https://dashboard.aspose.cloud/ から ClientID と ClientSecret を取得します。
    String clientId = "bbf94a2c-6d7e-4020-b4d2-b9809741374e";
    String clientSecret = "1c9379bb7d701c26cc87e741a29987bb";

    // API 呼び出しの詳細
    com.aspose.html.Configuration.setAPP_SID(clientId);
    com.aspose.html.Configuration.setAPI_KEY(clientSecret);
    com.aspose.html.Configuration.setBasePath("https://api.aspose.cloud/v3.0");
    com.aspose.html.Configuration.setAuthPath("https://api.aspose.cloud/connect/token");
    com.aspose.html.Configuration.setUserAgent("WebKit");
    com.aspose.html.Configuration.setDebug(true);

    // Aspose.HTML Cloud API のオブジェクトを作成する
    com.aspose.html.api.ConversionApi htmlApi = new ApiClient().createService(ConversionApi.class);

    // クラウド ストレージからの html ドキュメント
    String name = "list.html";
    // 結果の画像フォーマット
    String outFormat = "PNG";

    Integer width = 800; // Resulting image width.
    Integer height = 1000; // Resulting image height.
    Integer leftMargin = 10; // Left resulting image margin.
    Integer rightMargin = 10; // Right resulting image margin.
    Integer topMargin = 10; // Top resulting image margin.
    Integer bottomMargin = 10; // Bottom resulting image margin.
    Integer resolution = 300; // Resolution of resulting image.
    String folder = null; // The folder in the storage. Should exist.
    String storage = "Internal"; // Name of the storage. null

    // HTML から XPS への変換用の API を呼び出す
    retrofit2.Call<okhttp3.ResponseBody> call = htmlApi.GetConvertDocumentToXps(name, width, height, leftMargin, rightMargin, topMargin, bottomMargin, folder, storage);

    System.out.println("HTML to XPS conversion sucessfull !");
    }catch(Exception ex)
    {
        System.out.println(ex);
    }
上記のコードは応答ストリームで結果を返すため、出力をローカル ドライブに保存するために、次のカスタム メソッドの使用を検討できます。
/*
* ResponseBody と結果のファイル名を引数とするメソッド
*/
public static void checkAndSave(retrofit2.Call<okhttp3.ResponseBody> call, String fileName) throws IOException
	{
	    // リクエストを同期的に送信し、そのレスポンスを返します。
	    retrofit2.Response<okhttp3.ResponseBody> res = call.execute();

	    // 成功した応答の逆シリアル化された応答本文
	    okhttp3.ResponseBody answer = res.body();

	    //テストディレクトリに保存
	    boolean result = saveToDisc(answer, fileName);

	    // 結果値が true であることを検証します (オプションの手順)
	    Assert.assertTrue(result);
	}

  /*
  *
  * このメソッドを呼び出して、応答コンテンツをファイルとしてローカル ドライブに保存します。
  *
  */
	public static boolean saveToDisc(okhttp3.ResponseBody body, String fileName)
	{
            // 結果ファイルの場所を示すファイル オブジェクトを作成する
	    File savedFile = new File("c:\\Downloads\\"+fileName);

	    try (InputStream inputStream = body.byteStream();
	    OutputStream outputStream = new FileOutputStream(savedFile))
	    {
	    byte[] fileReader = new byte[4096];
	    long fileSizeDownloaded = 0;

	    while (true) {
	        int read = inputStream.read(fileReader);
		if (read == -1) break;

                // ファイル ストリームをローカル ドライブに保存する
		outputStream.write(fileReader, 0, read);
		fileSizeDownloaded += read;
            }
	    // 出力ストリーム インスタンスをクリアします
	    outputStream.flush();

	    // ファイルが正常に保存された場合は true を返します
	    return true;
	    } catch (Exception e) {
		e.printStackTrace();
		return false;
	    }
	} // saveToDisc ends here
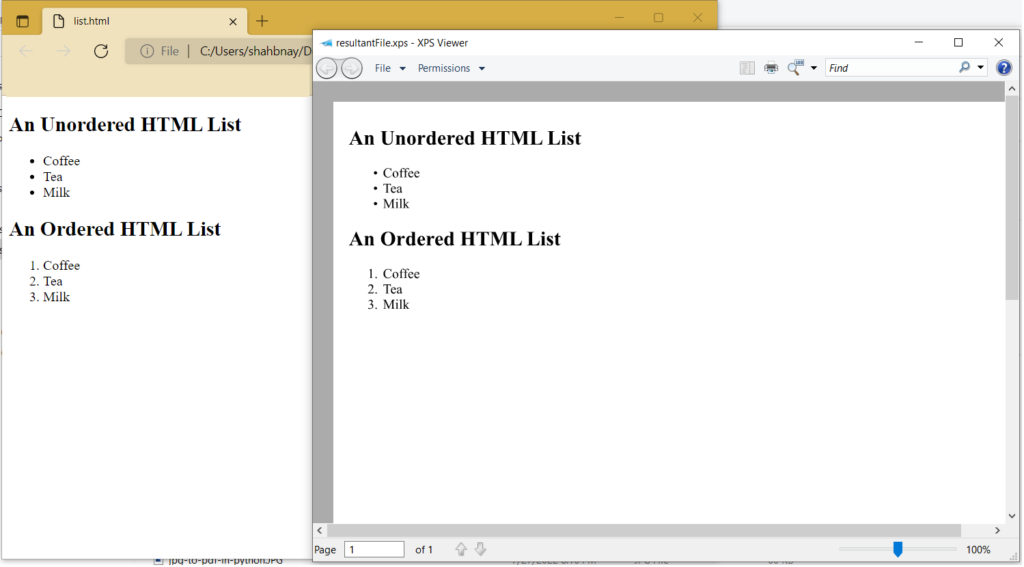
Image1:- HTML から XPS へのプレビュー
上記の例で使用されているサンプル ファイルは、list.html および resultantFile.xps からダウンロードできます。
cURL コマンドを使用した HTML から XPS への変換
REST API には cURL コマンドからもアクセスできるため、このセクションでは、cURL コマンドを使用して HTML から XPS への変換を実行する手順を学習します。前提条件として、最初に個々のクライアント資格情報に基づいて JSON Web トークン (JWT) を生成する必要があります。以下のコマンドを実行して JWT トークンを生成してください。
curl -v "https://api.aspose.cloud/connect/token" \
-X POST \
-d "grant_type=client_credentials&client_id=bbf94a2c-6d7e-4020-b4d2-b9809741374e&client_secret=1c9379bb7d701c26cc87e741a29987bb" \
-H "Content-Type: application/x-www-form-urlencoded" \
-H "Accept: application/json"
JWT トークンを取得したので、ターミナルで次のコマンドを実行して、HTML から XPS への変換を実行してください。
curl -v -X GET "https://api.aspose.cloud/html/list.html/convert/xps" \
-H  "accept: multipart/form-data" \
-H  "authorization: Bearer <JWT Token>" \
-o final.xps
結論
この記事では、REST API を使用して HTML を XPS に変換する方法について詳しく説明しました。 Java コード スニペットと cURL コマンドを使用して、HTML を XPS に変換する手順を学習しました。さらに、製品 ドキュメンテーション は、API によって提供される驚くべき機能を学習するための優れたソースであることに注意してください。また、API の使用中に問題が発生した場合は、無料の製品サポート フォーラム までお気軽にお問い合わせください。
関連記事
以下の詳細については、次のブログも参照することをお勧めします。