Java SDK નો ઉપયોગ કરીને બારકોડ સ્કેનર એપ્લિકેશન કેવી રીતે વિકસિત કરવી. તમારી વેબ, મોબાઇલ અને ડેસ્કટોપ એપ્લિકેશન્સમાં QR સ્કેન ક્ષમતાઓ લાગુ કરો.
બારકોડ ઓનલાઈન સ્કેન કરો | QR કોડ સ્કેનર
આ લેખમાં, અમે Java REST API નો ઉપયોગ કરીને બારકોડ સ્કેનર અને QR કોડ સ્કેનર એપ્લિકેશન કેવી રીતે વિકસાવવી તેની વિગતોની ચર્ચા કરવા જઈ રહ્યા છીએ. અમે સમજીએ છીએ કે આજની ઝડપી અર્થવ્યવસ્થામાં, બારકોડ એ વિક્રેતાઓ અને વેપારીઓ માટે ઉત્પાદન વિગતો સંગ્રહિત કરવા માટે આવશ્યક અને વ્યવહારુ ઉકેલ છે. વર્ષોથી, તેઓ વ્યવસાયો માટે મૂલ્યવાન અને વ્યવહારુ પસંદગી સાબિત થયા છે. તેઓએ કાર્યક્ષમતામાં ઘણો સુધારો કર્યો છે અને ઓવરહેડમાં ઘટાડો કર્યો છે. બારકોડ ખર્ચ-અસરકારક અને વિશ્વસનીય બંને છે. બારકોડનો ઉપયોગ કરવાના અન્ય ફાયદાઓમાં, નીચે ઉલ્લેખિત તેનો ઉપયોગ કરવાના થોડા વધુ ફાયદા છે
- બારકોડ માનવીય ભૂલની શક્યતાને દૂર કરે છે
- બારકોડ સિસ્ટમનો ઉપયોગ કર્મચારી તાલીમનો સમય ઘટાડે છે
- બારકોડ અત્યંત સર્વતોમુખી છે અને તેનો ઉપયોગ કોઈપણ પ્રકારના જરૂરી ડેટા સંગ્રહ માટે થઈ શકે છે
- તેઓ ચોક્કસ ઈન્વેન્ટરી નિયંત્રણને સક્ષમ કરે છે, અને તેથી ઈન્વેન્ટરી નિયંત્રણમાં સુધારો થાય છે
- વધુમાં, બારકોડ વધુ સારો ડેટા પ્રદાન કરે છે એટલે કે એક જ બારકોડ ઇન્વેન્ટરી અને કિંમતની વિગતો પ્રદાન કરી શકે છે.
આવી તમામ સુવિધાઓને અનુરૂપ, Aspose.BarCode Cloud Java SDK જાવા ડેવલપર્સને જાવા ભાષાનો ઉપયોગ કરીને બારકોડ ઓનલાઈન બનાવવા તેમજ સ્કેન કરવાની શક્તિ આપે છે. અમારા અન્ય ક્લાઉડ API ની જેમ જ, Aspose.BarCode Cloud Java SDK માટે તમારે [Cloud Dashboard] પર એકાઉન્ટ રજીસ્ટર કરાવવું જરૂરી છે. 2 જો તમે પહેલેથી જ એકાઉન્ટ રજીસ્ટર કર્યું હોય, તો તમે તેનો ઉપયોગ કરવાનું ચાલુ રાખી શકો છો. એકવાર તમારું એકાઉન્ટ તૈયાર થઈ જાય, પછી તમે AppKey અને AppSID દ્વારા ક્લાઉડ સેવાઓનો ઉપયોગ કરવા માટે સારા છો.
તમે Aspose ક્લાઉડ સ્ટોરેજનો ઉપયોગ કરવાનું વિચારી શકો છો અથવા, ફાઇલ સ્ટોરેજ અને પુનઃપ્રાપ્તિ માટે કોઈપણ તૃતીય-પક્ષ ક્લાઉડ સ્ટોરેજ સેવાઓનો ઉપયોગ કરી શકો છો.
સમર્થિત બારકોડ પ્રતીકો
SDK EAN, UPC, Codabar, PDF417, QR, MicroQR, Postnet, Planet, RM4SCC, વગેરે જેવા અસંખ્ય બારકોડ પ્રતીકો (60 થી વધુ) ને સપોર્ટ કરે છે. તમને હાલની બારકોડ માહિતી લોડ કરવાનો અને આઉટપુટને લોકપ્રિય ઇમેજમાં સાચવવાનો વિકલ્પ પણ મળે છે. ફોર્મેટ્સ, જેમ કે JPEG, PNG, GIF, BMP, TIFF, EMF, WMF, SVG, EXIF, અને ICON. સમર્થિત પ્રતીકોની સંપૂર્ણ સૂચિ માટે, કૃપા કરીને [Aspose.BarCode Cloud Java SDK] ની મુલાકાત લો 13.
બારકોડ જનરેટ કરો
SDK તમને લીનિયર, 2D અને પોસ્ટલ બારકોડ ઈમેજીસ ઘણા બધા ફોર્મેટમાં બનાવવાની ઑફર કરે છે. તમે ઇમેજ પહોળાઈ, ઊંચાઈ, બોર્ડર સ્ટાઇલ અને આઉટપુટ ઇમેજ ફોર્મેટ જેવા બારકોડ ઇમેજ એટ્રિબ્યુટ્સનો ઉલ્લેખ કરી શકો છો. તમે તમારી એપ્લિકેશન આવશ્યકતાઓ અનુસાર બારકોડ પ્રકાર અને ટેક્સ્ટ લક્ષણો જેમ કે ટેક્સ્ટ સ્થાન અને ફોન્ટ શૈલીઓનો પણ ઉલ્લેખ કરી શકો છો. તે બારની ઊંચાઈ સેટ કરવા અને બારકોડ ઇમેજને એક ખૂણા પર ફેરવવાની ક્ષમતા પણ પ્રદાન કરે છે.
નીચેનું ઉદાહરણ કોડ39 માનક બારકોડ બનાવવા માટેનાં પગલાંઓ બતાવે છે, જે પૃષ્ઠના ટોપ-સેન્ટર ગોઠવણી પર મૂકવામાં આવે છે. ટેક્સ્ટનો રંગ નેવી, હોરિઝોન્ટલ તરીકે ઉલ્લેખિત છે અને વર્ટિકલ રિઝોલ્યુશન 200 તરીકે સ્પષ્ટ થયેલ છે. બારકલર નારંગી તરીકે સ્પષ્ટ થયેલ છે, પૃષ્ઠભૂમિ રંગ સિલ્વર તરીકે સેટ છે અને આઉટપુટ ફોર્મેટ JPEG ફોર્મેટ છે.
અમે આગળ વધીએ તે પહેલાં, અમે તમને નીચેની લિંકની મુલાકાત લેવાની ભલામણ કરીએ છીએ કારણ કે cURL આદેશનો ઉપયોગ કરીને API ઍક્સેસ કરતી વખતે JWT ટોકન જરૂરી છે.
સીઆરએલ
curl -X PUT "https://api.aspose.cloud/v3.0/barcode/MySample.jpeg/generate?Type=Code39Standard&Text=BarCode%20processing&TextLocation=Above&TextAlignment=Center&TextColor=Navy&FontSizeMode=Auto&Resolution=200&ResolutionX=200&BackColor=silver&BarColor=Orange&BorderColor=Blue&format=jpeg" \
-H  "accept: application/json" \
-H  "authorization: Bearer <JWT Token>"
વિનંતી URL
https://api.aspose.cloud/v3.0/barcode/MySample.jpeg/generate?Type=Code39Standard&Text=BarCode%20processing&TextLocation=Above&TextAlignment=Center&TextColor=Navy&FontSizeMode=Auto&Resolution=200&ResolutionX=200&BackColor=silver&BarColor=Orange&BorderColor=Blue&format=jpeg
જાવા
ApiClient client = new ApiClient(
"App SID from https://dashboard.aspose.cloud/#/apps",
"App Key from https://dashboard.aspose.cloud/#/apps");

com.aspose.barcode.cloud.api.BarcodeApi api = new com.aspose.barcode.cloud.api.BarcodeApi(client);
String name = "MySample.jpeg";
String type = com.aspose.barcode.cloud.model.EncodeBarcodeType.CODE39STANDARD.getValue();
String text = "Barcode processing API"; // String | Text to encode.
String twoDDisplayText = null;
String textLocation = com.aspose.barcode.cloud.model.CodeLocation.ABOVE.getValue();
String textAlignment = com.aspose.barcode.cloud.model.TextAlignment.CENTER.getValue();
String textColor = "Navy";
String fontSizeMode = com.aspose.barcode.cloud.model.FontMode.AUTO.getValue();
int resolution = 200;
double resolutionX = 200;
double resolutionY = 200;
String barColor = "Orange";
String format = "JPEG";

try {
com.aspose.barcode.cloud.model.ResultImageInfo result = api.putBarcodeGenerateFile(
    name,
		type,
		text,
		twoDDisplayText,
		textLocation,
		textAlignment,
		textColor,
		fontSizeMode,
		(double) resolution,
		resolutionX,
		resolutionY,
		null,
		null,
		null,
		null,
		null,
		null,
		null,
		null,
		"Silver",
		barColor,
		"Blue",
		null,
		null,
		true,
		null,
		null,
		null,
		null,
		null,
		null,
		null,
		null,
		null,
		null,
		format);

  System.out.println(result);
	} catch (ApiException e) {
  System.err.println("Exception when calling BarcodeApi#PutBarcodeGenerateFile");
	e.printStackTrace();
}
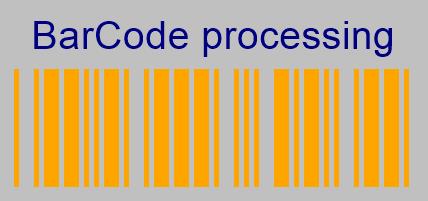
છબી 1:- પરિણામી બારકોડ પૂર્વાવલોકન.
બારકોડ રીડર ઓનલાઇન
છબી 2: QR કોડ સ્કેનર
ક્લાઉડ API હાલના બારકોડ્સમાંથી માહિતીને ઓળખવામાં પણ સક્ષમ છે. તમને ઝડપી પુનઃપ્રાપ્તિ માટે બારકોડ પ્રકારની વિગતોનો ઉલ્લેખ કરવાનો વિકલ્પ મળે છે અથવા API ને આપમેળે પ્રકાર નક્કી કરવા દો. તમે ChecksumValidation વિગતો, DetectEncodingનો ઉલ્લેખ પણ કરી શકો છો અથવા API ને રનટાઈમ પર તે નક્કી કરવા દો.
સીઆરએલ
curl -X POST "https://api.aspose.cloud/v3.0/barcode/recognize?Type=all&DetectEncoding=true" \
-H  "accept: application/json" \
-H  "authorization: Bearer <JWT Token>" \
-H  "Content-Type: multipart/form-data" \
-H  "x-aspose-client: Containerize.Swagger" -d {"image":{}}
વિનંતી URL
https://api.aspose.cloud/v3.0/barcode/recognize?Type=all&DetectEncoding=true
જાવા
// સંપૂર્ણ ઉદાહરણો અને ડેટા ફાઇલો માટે, કૃપા કરીને https://github.com/aspose-barcode-cloud/aspose-barcode-cloud-java/ પર જાઓ

String type = null;
String checksumValidation = ChecksumValidation.OFF.toString();
Boolean detectEncoding = null;
String preset = PresetType.HIGHPERFORMANCE.toString();

Integer rectX = null;
Integer rectY = null;
Integer rectWidth = null;
Integer rectHeight = null;
Boolean stripFNC = null;
Integer timeout = null;
Integer medianSmoothingWindowSize = null;
Boolean allowMedianSmoothing = null;
Boolean allowComplexBackground = null;
Boolean allowDatamatrixIndustrialBarcodes = null;
Boolean allowDecreasedImage = null;
Boolean allowDetectScanGap = null;
Boolean allowIncorrectBarcodes = null;
Boolean allowInvertImage = null;
Boolean allowMicroWhiteSpotsRemoving = null;
Boolean allowOneDFastBarcodesDetector = null;
Boolean allowOneDWipedBarsRestoration = null;
Boolean allowQRMicroQrRestoration = null;
Boolean allowRegularImage = null;
Boolean allowSaltAndPepperFiltering = null;
Boolean allowWhiteSpotsRemoving = null;
Double regionLikelihoodThresholdPercent = null;
List<Integer> scanWindowSizes = null;
Double similarity = null;
Boolean skipDiagonalSearch = null;
String australianPostEncodingTable = null;
String rectangleRegion = null;
String url = null;

Path currentRelativePath = Paths.get("");
String currentPath = currentRelativePath.toAbsolutePath().toString();
Path filePath = Paths.get(currentPath, "data", "sample.png");

File image = new File(String.valueOf(filePath));

BarcodeResponseList response =
   	 api.postBarcodeRecognizeFromUrlOrContent(
      		type,checksumValidation,detectEncoding,preset,rectX,rectY,rectWidth,rectHeight,
      		stripFNC,timeout,medianSmoothingWindowSize,allowMedianSmoothing,allowComplexBackground,
      		allowDatamatrixIndustrialBarcodes,allowDecreasedImage,allowDetectScanGap,
		allowIncorrectBarcodes,allowInvertImage,allowMicroWhiteSpotsRemoving,allowOneDFastBarcodesDetector,
      		allowOneDWipedBarsRestoration,allowQRMicroQrRestoration,allowRegularImage,allowSaltAndPepperFiltering,
      		allowWhiteSpotsRemoving,regionLikelihoodThresholdPercent,scanWindowSizes,similarity,skipDiagonalSearch,
      		australianPostEncodingTable,rectangleRegion,url,image);

assertNotNull(response);
assertFalse(response.getBarcodes().isEmpty());

BarcodeResponse barcode = response.getBarcodes().get(0);
assertEquals(DecodeBarcodeType.CODE11.getValue(), barcode.getType());
assertEquals("1234567812", barcode.getBarcodeValue());
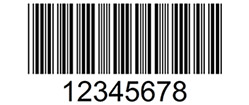
છબી 3:- 2D બારકોડ પૂર્વાવલોકન.
જો તમે ઉપરોક્ત ઉલ્લેખિત ઈમેજ પર ઉપરોક્ત કોડ ચલાવો છો, તો પ્રતિભાવ સંસ્થા આઉટપુટને આ રીતે રેન્ડર કરશે
પ્રતિભાવ શરીર
{ "barcodes": [ { "barcodeValue": "12345678", "type": "Code39Standard", "region": [ { "x": **28**, "y": **3** }, { "x": **222**, "y": **3** }, { "x": **222**, "y": **74** }, { "x": **28**, "y": **74** } ], "checksum": "" } ] }
નિષ્કર્ષ
આ લેખમાં, અમે Java REST API નો ઉપયોગ કરીને બારકોડ સ્કેનર એપ્લિકેશન કેવી રીતે વિકસાવવી તેના પગલાંઓ શીખ્યા છે. એ જ રીતે, API તમને ઇમેજ ફાઇલમાંથી QR કોડ રીડર અમલમાં મૂકવા માટે પણ સક્ષમ કરે છે. Java SDK નો ઉપયોગ કરવા ઉપરાંત, અમને cURL આદેશોનો ઉપયોગ કરીને ઑનલાઇન બારકોડ સ્કેન કરવાનો વિકલ્પ પણ મળે છે. કોઈ વધારાના સૉફ્ટવેર ડાઉનલોડ અથવા ઇન્સ્ટોલેશનની જરૂર નથી. જો તમને API નો ઉપયોગ કરતી વખતે કોઈ સમસ્યા આવે તો, કૃપા કરીને ફ્રી પ્રોડક્ટ સપોર્ટ ફોરમ દ્વારા અમારો સંપર્ક કરવા માટે નિઃસંકોચ કરો.
સંબંધિત લેખો
અમે આ વિશે વધુ જાણવા માટે નીચેની લિંક્સની મુલાકાત લેવાની પણ ભલામણ કરીએ છીએ: