
在 PDF 页脚部分添加图像和文本在各种情况下都很有用,例如在文档中添加品牌或法律信息。在许多行业中,在文档的每一页底部添加公司徽标或免责声明是一项常见要求。在其他情况下,可能需要添加页码或其他元数据来帮助组织或识别文档。无论具体用例如何,将图像和文本添加到 PDF 文档页脚部分的能力对于许多企业和组织来说都是一项重要功能。在本文中,我们将探讨如何使用 Python Cloud SDK 将图像和文本添加到 PDF 文档的页脚部分。
页脚的另一个术语是“跑脚”。它在出版业中被广泛使用,之所以这样称呼,是因为它包含文章的缩短版本或有关文章的其他信息。
- Python 云 SDK
- 使用 Python 在 PDF 中添加文本页脚
- 使用 Python 在 PDF 中添加图像页脚
- 使用 cURL 命令向 PDF 添加文本页脚
- 使用 cURL 命令将图像页脚添加到 PDF
Python 云 SDK
Aspose.PDF Cloud SDK for Python 提供了一组用于处理 PDF 文档的强大功能,包括向 PDF 文档页脚部分添加图像和文本的功能。此 SDK 提供了一个简单直观的界面,可轻松以编程方式执行各种与 PDF 相关的任务。使用此 SDK,您可以快速轻松地将自定义文本或图像添加到任何 PDF 文档的页脚,从而为您的文档提供专业且定制的外观。
SDK 可通过 PIP 和 GitHub 存储库下载。不过,您也可以在终端/命令提示符下执行以下命令,在系统上安装最新版本的 SDK。
pip install asposepdfcloud
下一个重要步骤是从 云仪表板 获取客户端凭据。如果您有 GitHub 或 Google 帐户,只需注册,或者单击 创建新帐户 按钮并提供所需的信息。
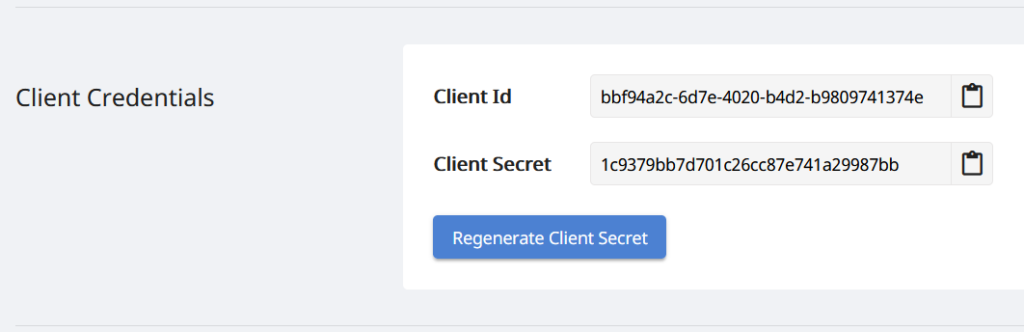
图 1:- Aspose.Cloud 仪表板上的客户端凭证。
使用 Python 在 PDF 中添加文本页脚
请按照以下步骤使用 Python 代码片段在 PDF 文档中添加文本页脚。
- 第一步是创建 ApiClient 类的实例,它需要客户端 ID 客户端密钥作为参数。
- 其次,创建一个 PdfApi 类的实例,该实例需要 ApiClient 对象作为输入参数。
- 第三,创建一个 TextFooter 对象,我们将水平对齐方式设置为 Center、不透明度设置为 0.7、旋转角度设置为 356 度,并将底部边距指定为 5。
- 为了设置 TextFooter 的文本格式,创建一个 TextState 对象,我们在其中定义前景色、字体大小、字体名称等。
- 现在我们需要设置两个可选参数的值来定义 PDF 文档的起始页和结束页以放置文本页脚。
- 最后,调用 postdocumenttextfooter(..) 方法将文本页脚添加到 PDF 文档并将结果文件保存到云存储。
def addTextFooter():
    try:
        #Client credentials
        client_secret = "1c9379bb7d701c26cc87e741a29987bb"
        client_id = "bbf94a2c-6d7e-4020-b4d2-b9809741374e"

        #initialize PdfApi client instance using client credetials
        pdf_api_client = asposepdfcloud.api_client.ApiClient(client_secret, client_id)

        # 创建 PdfApi 实例并传递 PdfApiClient 作为参数
        pdf_api = PdfApi(pdf_api_client)

        # 输入 PDF 文件
        input_file = 'marketing.pdf'

        # 创建 TextFooter 实例
        textFooter = asposepdfcloud.TextFooter()
        textFooter.background = True
        # 将页脚的水平对齐方式设置为居中
        textFooter.horizontal_alignment = 'Center'
        # 将页脚的不透明度设置为 0.7
        textFooter.opacity = 0.7
        textFooter.rotate = None
        # 设置旋转角度为 5 度
        textFooter.rotate_angle = 5
        textFooter.x_indent = 100
        textFooter.y_indent = 100
        textFooter.zoom = .8
        # 在页脚部分显示的文本值
        textFooter.value = 'Aspose.PDF Cloud SDK for Python'

        # 创建 TextState 实例来定义文本的格式
        textState = asposepdfcloud.TextState(font_size=15, font='Arial', foreground_color=
              {"A": 0,
              "R": 66,
              "G": 111,
              "B": 245},
              background_color= {
              "A": 10,
              "R": 179,
              "G": 245,
              "B": 66},
              font_style=1)
        # 将 TextState 对象分配给 TextFooter
        textFooter.text_state = textState

        # PDF 的页脚起始页
        startPage = 2
        # PDF 的结束页作为页脚
        endPage = 3

        # 调用 API 在 PDF 文件的第二页和第三页添加文本页脚
        response = pdf_api.post_document_text_footer(name = input_file, text_footer= textFooter, start_page_number = startPage, end_page_number=endPage)

        # 在控制台中打印响应代码
        print(response)

        # 在控制台中打印消息(可选)
        print('Text Footer successfully added to PDF !')
    except ApiException as e:
        print("Exception while calling PdfApi: {0}".format(e))
        print("Code:" + str(e.code))
        print("Message:" + e.message)
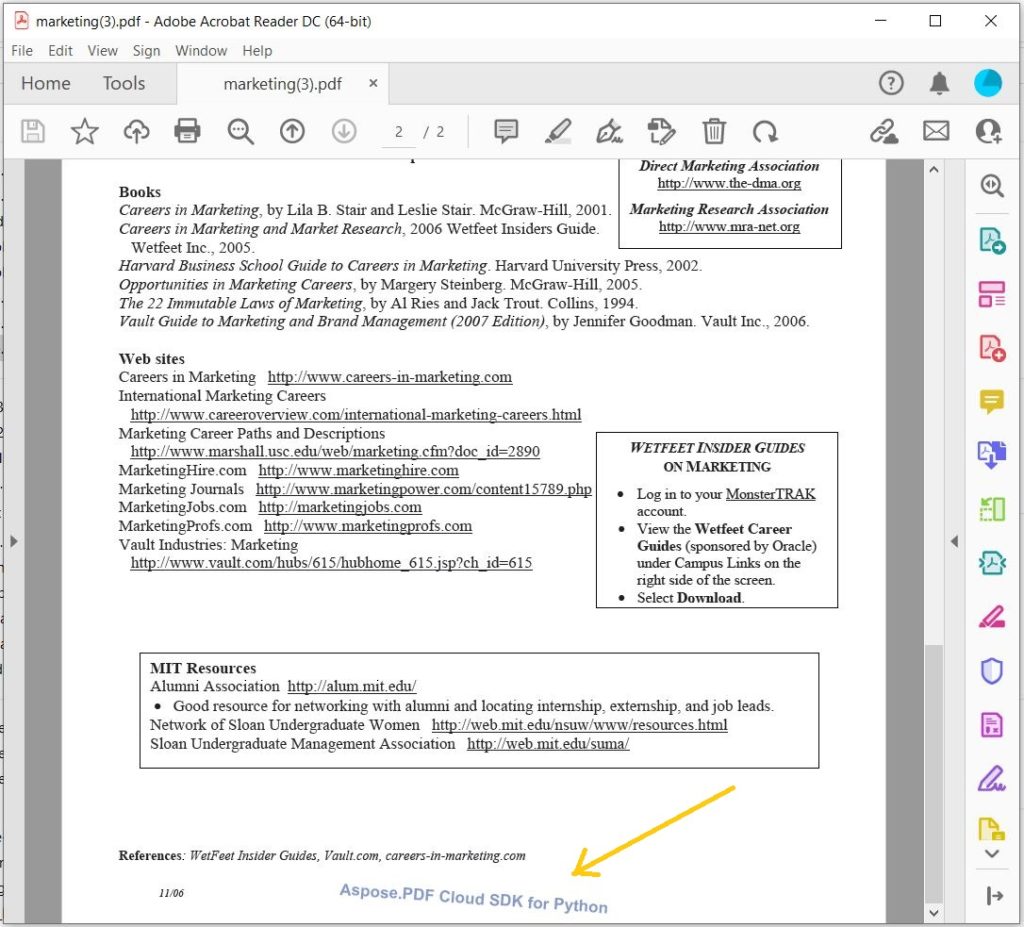
图 2:- 添加到 PDF 的 TextFooter 预览。
请访问以下链接下载输入的marketing.pdf和结果的marketing-TextFooter.pdf。
使用 Python 在 PDF 中添加图像页脚
API 还提供了向 PDF 文件添加图像页脚的功能。请按照以下说明完成此要求。
- 第一步是创建 ApiClient 类的实例,它需要客户端 ID 客户端密钥作为参数。
- 其次,创建一个 PdfApi 类的实例,该实例需要 ApiClient 对象作为输入参数。
- 第三,创建一个 ImageFooter 对象,我们将水平对齐方式设置为 Center、不透明度设置为 0.7、旋转角度设置为 10,并指定了图像文件名、边距详细信息和其他属性。
- 因为我们只需要将页脚添加到文档的第一页,所以我们为startpagenumber和endpagenumber可选参数设置了值。
- 最后,调用 postdocumentimagefooter(..) 方法将文本页脚添加到 PDF 文档并将结果文件保存到云存储。
def addImageFooter():
    try:
        #Client credentials
        client_secret = "1c9379bb7d701c26cc87e741a29987bb"
        client_id = "bbf94a2c-6d7e-4020-b4d2-b9809741374e"

        #initialize PdfApi client instance using client credetials
        pdf_api_client = asposepdfcloud.api_client.ApiClient(client_secret, client_id)

        # 创建 PdfApi 实例并传递 PdfApiClient 作为参数
        pdf_api = PdfApi(pdf_api_client)

        # 输入PDF文档
        input_file = 'marketing.pdf'

        # 创建 ImageFooter 实例
        imageFooter = asposepdfcloud.ImageFooter()

        # 在 PDF 内容顶部呈现页眉
        imageFooter.background = False
        # 设置左对齐
        imageFooter.horizontal_alignment = 'Left'
        # 将不透明度设置为 70%
        imageFooter.opacity = 0.7
        imageFooter.rotate = None
        imageFooter.rotate_angle = 10
        imageFooter.x_indent = 10
        imageFooter.y_indent = 10
        imageFooter.zoom = .7

        # 输入图像文件
        imageFooter.file_name = 'Koala.jpg'
        # 设置图像宽度和高度细节
        imageFooter.width = 100
        imageFooter.height = 100
        # 指定页脚图像的边距详细信息
        imageFooter.bottom_margin = 2
        imageFooter.left_margin = 1
        imageFooter.right_margin = 10

        # 文档的起始页添加页脚
        startPage = 1
        # 文档的起始页添加页脚
        endPage = 1

        # 调用 API 渲染 PDF 文件中的图片页脚
        response = pdf_api.post_document_image_footer(name = input_file, image_footer= imageFooter, start_page_number = startPage, end_page_number=endPage)

        # 在控制台中打印响应代码
        print(response)

        # 在控制台中打印消息(可选)
        print('Image Footer successfully added to PDF !')
    except ApiException as e:
        print("Exception while calling PdfApi: {0}".format(e))
        print("Code:" + str(e.code))
        print("Message:" + e.message)
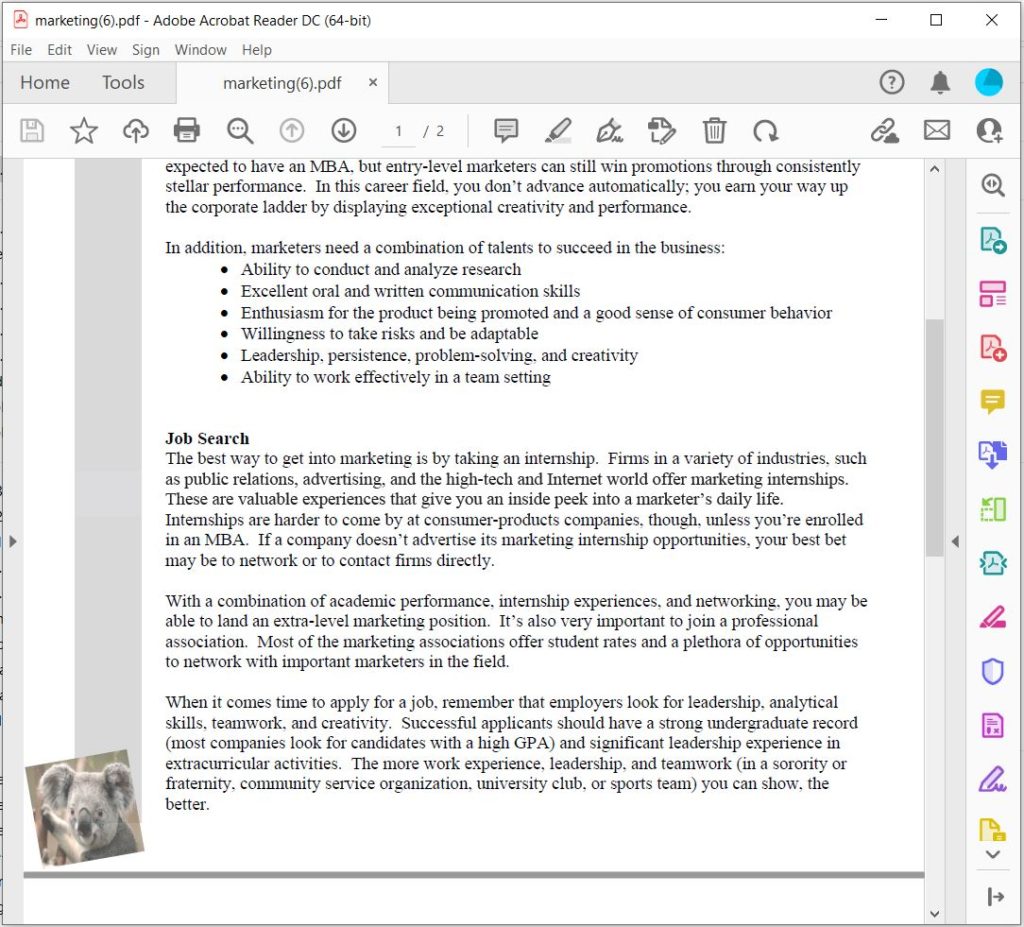
图 3:PDF 中图像页脚的预览。
上述示例生成的结果文件可以从marketing-ImageFooter.pdf下载。
使用 cURL 命令向 PDF 添加文本页脚
使用 cURL 命令和 Aspose.PDF Cloud 在 PDF 页脚中添加文本和图像具有多种优势。首先,它消除了手动编辑 PDF 文档的需要,而手动编辑 PDF 文档既耗时又容易出错。其次,它可以轻松自定义页眉文本,并能够更改文本的字体、大小、颜色和位置。第三,它使用户能够同时向多个 PDF 文档添加文本,从而节省时间并提高效率。最后,这种方法提供了一种安全可靠的方法来向 PDF 页眉添加文本,所有数据都通过安全连接传输并在安全服务器上处理。
现在,作为先决条件,通过执行以下命令生成 JSON Web Token (JWT)。
curl -v "https://api.aspose.cloud/connect/token" \
-X POST \
-d "grant_type=client_credentials&client_id=88d1cda8-b12c-4a80-b1ad-c85ac483c5c5&client_secret=406b404b2df649611e508bbcfcd2a77f" \
-H "Content-Type: application/x-www-form-urlencoded" \
-H "Accept: application/json"
现在我们已经生成了 JWT 令牌,我们需要执行以下命令将 TextFooter 添加到 PDF 文件。
curl -X POST "https://api.aspose.cloud/v3.0/pdf/marketing.pdf/footer/text?startPageNumber=2&endPageNumber=3" \
-H  "accept: application/json" \
-H  "authorization: Bearer <JWT Token>" \
-H  "Content-Type: application/json" \
-d "{  \"Background\": true,  \"HorizontalAlignment\": \"Center\",  \"Opacity\": 0.7,  \"Rotate\": \"None\",  \"RotateAngle\": 5,  \"XIndent\": 100,  \"YIndent\": 100,  \"Zoom\": 0.8,  \"Value\": \"Aspose.PDF Cloud SDK for Python\",  \"TextState\": {    \"FontSize\": 15,    \"Font\": \"Arial\",    \"ForegroundColor\": {      \"A\": 0,      \"R\": 66,      \"G\": 111,      \"B\": 245    },    \"BackgroundColor\": {      \"A\": 10,      \"R\": 179,      \"G\": 245,      \"B\": 66    },    \"FontStyle\": \"Regular\"  },  \"BottomMargin\": 3,  \"LeftMargin\": 3,  \"RightMargin\": 3}"
使用 cURL 命令将图像页脚添加到 PDF
请执行以下命令,使用 cURL 命令将图像头添加到 PDF 文件。
curl -X POST "https://api.aspose.cloud/v3.0/pdf/marketing.pdf/footer/image?startPageNumber=1&endPageNumber=1" \
-H  "accept: application/json" \
-H  "authorization: Bearer <JWT Token>" \
-H  "Content-Type: application/json" \
-d "{  \"Background\": false,  \"HorizontalAlignment\": \"Left\",  \"Opacity\": 0.7,  \"Rotate\": \"None\",  \"RotateAngle\": 10,  \"XIndent\": 10,  \"YIndent\": 10,  \"Zoom\": 0.7,  \"FileName\": \"Koala.jpg\",  \"Width\": 100,  \"Height\": 100,  \"BottomMargin\": 2,  \"LeftMargin\": 1,  \"RightMargin\": 10}"
结论
总之,将图像和文本添加到 PDF 文档的页脚部分对于各种目的(包括品牌推广、法律合规性和文档组织)来说都是非常有用的功能。Aspose.PDF Cloud SDK for Python 提供了一种方便而强大的方法来在您的 Python 应用程序中实现此功能。另一方面,使用 cURL 命令和 Aspose.PDF Cloud API 可以提供灵活性和简便性,以便将该功能集成到各种编程语言和环境中。无论您选择哪种方法,Aspose.PDF Cloud 都提供了强大而可靠的工具,可用于将图像和文本添加到 PDF 文档的页脚部分。
有用的链接
— 产品文档
相关文章
我们建议您阅读以下文章来了解: