
本部落格是我們上一篇部落格的延續,我們重點介紹了Aspose.PDF Cloud SDK for Java 的一些令人興奮的功能,介紹如何使用Java REST API 添加突出顯示或刪除線文本,以及在PDF 中添加線條或圓形註釋 。在本文中,我們將特別討論使用 Java 程式語言在 PDF 文件中添加文字、折線、Squiggly 和附件註釋的詳細資訊。
Aspose.PDF Cloud 是一個 REST API,使用戶能夠建立、操作現有 PDF 文件並將其呈現為其他支援的文件格式。可以透過以下兩種方式存取雲端API:
- 透過 cURL 命令存取 API
- 使用 Java 程式語言存取 API
讓我們進一步討論使用 cURL 命令和 Java 程式碼為 PDF 文件添加各種註解。
使用 cURL 指令新增註釋
cURL 指令是存取 REST API 最簡單、最酷的方法之一。那我們來談談使用 cURL 指令來加入不同的註解。請注意,每個 API 還允許您存取可儲存檔案進行處理的雲端存儲,因此為了確保資料完整性,我們的 API 僅可供授權人員存取。因此,您需要先造訪Aspose.Cloud 儀表板,如果您有 GitHub 或 Google 帳戶,只需註冊即可。否則,請按一下建立新帳戶按鈕並提供所需資訊。現在使用憑證登入儀表板,從儀表板展開「應用程式」部分,然後向下捲動至「用戶端憑證」部分以查看用戶端 ID 和用戶端金鑰詳細資料。
現在,下一步是產生 JSON Web 令牌 (JWT),以便可以透過命令提示字元存取 API。
curl -v "https://api.aspose.cloud/connect/token" \
-X POST \
-d "grant_type=client_credentials&client_id=7042694c-5251-4aba-83c9-e81e7518724f&client_secret=db246d4742e8cd22e7266c9391992689" \
-H "Content-Type: application/x-www-form-urlencoded" \
-H "Accept: application/json"
文字註釋
文字註解是附加到 PDF 文件中特定位置的註解。關閉時,註釋顯示為圖示;打開時,它應該顯示一個彈出窗口,其中包含讀者選擇的字體和大小的註釋文字。要新增文字註釋,我們需要使用 PostPageTextAnnotation API。使用以下 cURL 指令新增帶有註解圖示的文字註解。
 curl -X POST "https://api.aspose.cloud/v3.0/pdf/PdfWithBookmarks.pdf/pages/1/annotations/text" \
-H  "accept: application/json" \
-H  "authorization: Bearer <JWT Token>" \
-H  "Content-Type: application/json" \
-d "[{  \"Color\": {  \"A\": 0, \"R\": 0xDA,  \"G\": 0xA5, \"B\": 0x20    },  \"Contents\": \"Hello World \",  \"Modified\": \"05/26/2021 03:10:00.000 PM\",    \"Id\": \"1\",    \"Flags\": [      \"Default\"    ],    \"Name\": \"string\",    \"Rect\": {      \"LLX\": 100,      \"LLY\": 800,      \"URX\": 100,      \"URY\": 100    },    \"PageIndex\": 1,    \"ZIndex\": 1,    \"HorizontalAlignment\": \"Center\",    \"VerticalAlignment\": \"Center\",    \"CreationDate\": \"string\",    \"Subject\": \"Subject of Annotation\",    \"Title\": \"Annotation Title\",    \"RichText\": \"string\",    \"State\": \"Undefined\",    \"Open\": true,    \"Icon\": \"Note\"  }]"
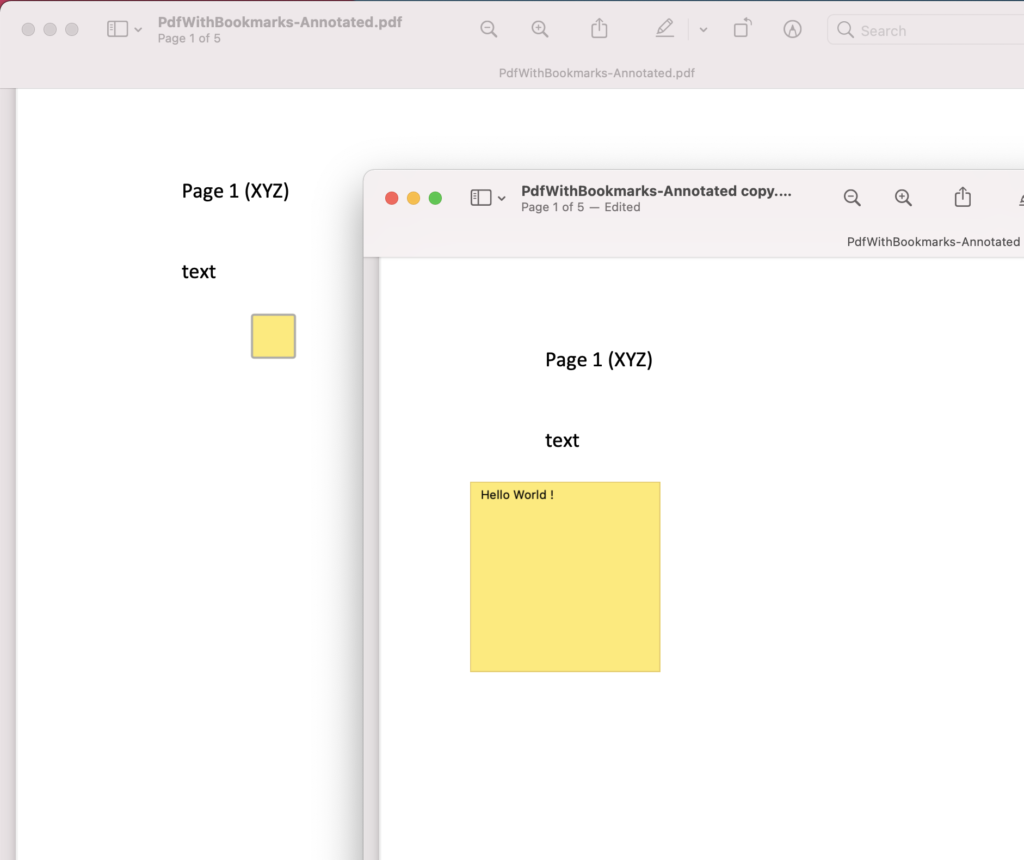
圖 1:- PDF 檔案中帶有註釋圖示的文字註釋。
上例中使用的範例 PDF 檔案可以從以下連結下載
折線註釋
折線註釋用於在頁面上手繪折線。它們可以包含由折線頂點定義的任意數量的邊。具有透明填充顏色的折線註釋只能在其可見線周圍進行選擇。也可以使用 PostPagePolyLineAnnotations API 新增折線註解。
curl -X POST "https://api.aspose.cloud/v3.0/pdf/PdfWithTable.pdf/pages/1/annotations/polyline" \
-H  "accept: application/json" \
-H  "authorization: Bearer " \
-H  "Content-Type: application/json" \
-d "[  {       \"Color\": {      \"A\": 0,      \"R\": 122,      \"G\": 132,      \"B\": 255    },    \"Contents\": \"Hello World...\",    \"Modified\": \"05/26/2021 03:10:00.000 PM\",    \"Id\": \"1\",    \"Flags\": [      \"Default\"    ],    \"Name\": \"Polyline\",    \"Rect\": {      \"LLX\": 100,      \"LLY\": 200,      \"URX\": 150,      \"URY\": 250    },    \"PageIndex\": 1,    \"ZIndex\": 1,    \"HorizontalAlignment\": \"Center\",    \"VerticalAlignment\": \"Center\",    \"CreationDate\": \"05/26/2021 03:10:00.000 PM\",    \"Subject\": \"Subject of Annotation\",    \"Title\": \"Title of Annotation\",    \"RichText\": \"<?xml version=\\\"1.0\\\"?><body xmlns=\\\"https://www.w3.org/1999/xhtml/\\\" xmlns:xfa=\\\"https://www.xfa.org/schema/xfa-data/1.0/\\\" xfa:APIVersion=\\\"Acrobat:7.0.0\\\" xfa:spec=\\\"2.0.2\\\" ><span style=\\\"text-decoration:;font-size:10.0pt\\\">Contents</span></body>\",    \"InteriorColor\": {      \"A\": 255,      \"R\": 120,      \"G\": 110,      \"B\": 255    },    \"StartingStyle\": \"Circle\",    \"EndingStyle\": \"OpenArrow\",    \"Intent\": \"PolyLineDimension\",    \"Vertices\": [      {            \"X\": 164.611,            \"Y\": 499.629          },          {            \"X\": 192.858,            \"Y\": 509.857          },          {            \"X\": 226.461,            \"Y\": 493.785          }    ]  }]"
波浪形註釋

波浪形或鋸齒狀下劃線註釋有助於突出顯示文件中的信息。可以使用 PostPageSquigglyAnnotations API 新增它們。下面給出的命令可協助您在 PDF 文件中新增 Squiggly 註釋。
curl -X POST "https://api.aspose.cloud/v3.0/pdf/PdfWithTable.pdf/pages/1/annotations/squiggly" \
-H  "accept: application/json" \
-H  "authorization: Bearer <JWT Token>" \
-H  "Content-Type: application/json" \
-d "[  {    \"Color\": {      \"A\": 255,      \"R\": 120,      \"G\": 123,      \"B\": 150    },    \"Contents\": \"A squiggly Annotation\",    \"Modified\": \"05/26/2021 03:10:00.000 PM\",    \"Id\": \"1\",    \"Flags\": [      \"Default\"    ],    \"Name\": \"First Annotation\",    \"Rect\": {      \"LLX\": 100,      \"LLY\": 300,      \"URX\": 120,      \"URY\": 330    },    \"PageIndex\": 1,    \"ZIndex\": 1,    \"HorizontalAlignment\": \"Center\",    \"VerticalAlignment\": \"Center\",    \"CreationDate\": \"05/26/2021 03:10:00.000 PM\",    \"Subject\": \"Subject \",    \"Title\": \"Title of Squiggly\",     \"Starting\": {      \"X\": 162.663,      \"Y\": 654.5    },    \"StartingStyle\": \"Circle\",    \"Ending\": {      \"X\": 230.845,      \"Y\": 654.5    },    \"EndingStyle\": \"OpenArrow\",    \"InteriorColor\": {      \"A\": 255,      \"R\": 220,      \"G\": 220,      \"B\": 220    },    \"LeaderLine\": 10,    \"LeaderLineExtension\": 5,    \"LeaderLineOffset\": 2.5,    \"ShowCaption\": true,    \"CaptionOffset\": {      \"X\": 7,      \"Y\": 8    },    \"CaptionPosition\": \"Top\",    \"Intent\": \"LineArrow\",\"RichText\": \"string\",    \"QuadPoints\": [      {        \"X\": 100,        \"Y\": 200      }    ]  }]"
附件註釋
可以將各種文件作為附件註釋新增到 PDF 文件中,為了實現此要求,可以使用 PostPageFileAttachmentAnnotations API。執行以下 cURL 指令將現有文件附加到 PDF 文件。在我們的範例中,名為 PdfWithTable.pdf 的檔案(已在雲端儲存上可用)用作附件。
curl -X POST "https://api.aspose.cloud/v3.0/pdf/PdfWithBookmarks.pdf/pages/1/annotations/fileattachment" \
-H  "accept: application/json" \
-H  "authorization: Bearer <JWT Token>" \
-H  "Content-Type: application/json" \
 -d "[  {       \"Color\": {      \"A\": 255,      \"R\": 120,      \"G\": 120,      \"B\": 120    },    \"Contents\": \"Content\",    \"Modified\": \"05/26/2021 03:10:00.000 PM\",    \"Id\": \"1\",    \"Flags\": [      \"Default\"    ],    \"Name\": \"FileAttachment\",    \"Rect\": {      \"LLX\": 100,      \"LLY\": 200,      \"URX\": 120,      \"URY\": 2200    },    \"PageIndex\": 1,    \"ZIndex\": 0,    \"HorizontalAlignment\": \"Center\",    \"VerticalAlignment\": \"Top\",    \"CreationDate\": \"05/26/2021 03:10:00.000 PM\",    \"Subject\": \"Subject\",    \"Title\": \"Title\",    \"RichText\": \"string\",    \"Icon\": \"PushPin\",    \"Opacity\": 0,    \"FileDescription\": \"string\",    \"FileName\": \"PdfWithTable.pdf\",    \"FilePath\": \"PdfWithTable.pdf\"  }]"
使用 Java 新增註釋
除了 cURL 命令之外,使用我們的雲端 API 的另一種方法是透過程式設計 SDK 存取它們。我們為流行的程式語言開發了程式設計 SDK。因此,若要使用 Java 語言處理 PDF 中的註釋,請嘗試使用 Aspose.PDF Cloud SDK for Java。
第一步是在系統上安裝 SKD。 Cloud SDK 可透過 Maven 和 GitHub 下載。現在,在 pom.xml 檔案中添加以下詳細信息,以在 Maven 建置專案中下載和使用 Aspose.Pdf.jar。
<repositories>
 <repository>
        <id>aspose-cloud</id>
        <name>artifact.aspose-cloud-releases</name>
        <url>https://artifact.aspose.cloud/repo</url>
    </repository>
</repositories>
<dependencies>
 <dependency>
        <groupId>com.aspose</groupId>
        <artifactId>aspose-pdf-cloud</artifactId>
        <version>21.1.0</version>
        <scope>compile</scope>
    </dependency>
 </dependencies>
欲了解更多信息,請訪問如何安裝Aspose.Cloud SDK。
文字註釋
下面給出了在 PDF 文件中添加文字註釋的步驟。
- 第一步是建立一個 PdfApi 對象,我們在其中提供 ClientID 和 ClientSecret 作為參數
- 然後我們建立新增註解的 Rectangle 對象
- LLX - 左下角的 X 座標。
- LLY - Y - 左下角的座標。
- URY - X - 右上角的座標。
- URY - Y - 右上角的座標。
- 建立 TextAnnotation 對象,我們使用 setHorizontalAlignment(..) 方法定義對齊方式。使用 setSubject(…) 方法設定主題,使用 setState(…) 方法設定預設狀態等
- 然後建立TextAnnotation類型的ArrayList<>對象,並將上面建立的TextAnnotation物件加入其中
- 最後,呼叫 postPageTextAnnotations(…),我們將輸入 PDF 檔案名稱、PageNumber 和上面建立的 Annotations ArrayList 作為參數傳遞
// 從 https://dashboard.aspose.cloud/ 取得 ClientID 和 ClientSecret
String clientId = "7042694c-5251-4aba-83c9-e81e7518724f";
String clientSecret = "db246d4742e8cd22e7266c9391992689";

// 建立PdfApi實例
PdfApi pdfApi = new PdfApi(clientSecret,clientId);

// 輸入PDF文檔
String name = "PdfWithTable.pdf";

// 從本機系統載入文件
File file = new File("/Users/nayyershahbaz/Downloads/" + name);
// 將文件上傳到雲端存儲
FilesUploadResult uploadResponse = pdfApi.uploadFile(name, file, null);

// 需要新增註解的頁碼
int pageNumber = 1;

// 建立新增註解的矩形對象
Rectangle rect = new Rectangle()
    .LLX(100.)
    .LLY(600.)
    .URX(200.)
    .URY(650.);

// 建立 AnnotationFlags 的 ListArray
List<AnnotationFlags> flags = new ArrayList<>();
flags.add(AnnotationFlags.DEFAULT);

// 建立 TextAnnotation 對象
TextAnnotation textAnnotation = new TextAnnotation();
textAnnotation.setName("Annotation Name");
textAnnotation.setRect(rect);
textAnnotation.setFlags(flags);
textAnnotation.setHorizontalAlignment(HorizontalAlignment.CENTER);

// 設定Annotation內顯示的內容
textAnnotation.contents("Hello World...");
// 設定註釋圖標
textAnnotation.icon(TextIcon.KEY);

textAnnotation.setSubject("Text Box Subj");
textAnnotation.setZindex(1);

// 註釋物件的預設狀態
textAnnotation.setState(AnnotationState.COMPLETED);

// 建立 TextAnnotation 的 ListArray
List<TextAnnotation> annotations = new ArrayList<>();

// 將上面建立的 TextAnnotation 新增至 List 實例
annotations.add(textAnnotation);

// 呼叫為PDF檔案新增註解的方法
AsposeResponse response = pdfApi.postPageTextAnnotations(name, pageNumber, annotations, null, null);
assertEquals(200, (int)response.getCode());
折線註釋
Cloud SDK 也提供了將折線註解新增至 PDF 文件的相同功能。下面給出了滿足此要求的步驟和程式碼片段。
- 首先,我們需要建立一個PdfApi實例並將原始檔案上傳到雲端儲存。
- 建立 Point 類型的 ArrayList,它定義將繪製折線的點。
- 下一步是建立一個 PolyLineAnnotation 對象,在其中定義矩形區域並將 Points ListArray 傳遞給 setVertices(…) 方法。
- 若要設定內部顏色,請使用方法 setInteriorColor(…) 並傳遞 Color 實例作為參數。
- 現在呼叫startingStyle(…)和endingStyle(…)方法來定義註解的開始和結束樣式。這些方法將 LineEnding 列舉中的值作為參數。
- 最後,呼叫 PdfApi 類別的 postPagePolyLineAnnotations(…) 方法來渲染 PDF 文件中的 Annotation。
// 從 https://dashboard.aspose.cloud/ 取得 ClientID 和 ClientSecret
String clientId = "a41d01ef-dfd5-4e02-ad29-bd85fe41e3e4";
String clientSecret = "d87269aade6a46cdc295b711e26809af";

// 建立PdfApi實例
PdfApi pdfApi = new PdfApi(clientSecret,clientId);

// 輸入PDF文檔
String name = "PdfWithTable.pdf";

// 從本機系統載入文件
File file = new File("/Users/nayyershahbaz/Downloads/" + name);
// 將文件上傳到雲端存儲
FilesUploadResult uploadResponse = pdfApi.uploadFile(name, file, null);

// 將會新增註解的輸入檔的頁碼
int pageNumber = 1;

// 註釋的矩形區域
Rectangle rect = new Rectangle()
    .LLX(100.)
    .LLY(600.)
    .URX(200.)
    .URY(650.);

// 指定註釋的頂點
List<Point> vertices = new ArrayList();
vertices.add(new Point().X(10.).Y(10.));
vertices.add(new Point().X(20.).Y(10.));
vertices.add(new Point().X(10.).Y(20.));
vertices.add(new Point().X(10.).Y(10.));

List<AnnotationFlags> flags = new ArrayList<>();
flags.add(AnnotationFlags.DEFAULT);

// 建立PolyLineAnnotation對象
PolyLineAnnotation annotation = new PolyLineAnnotation();
annotation.setName("Name");
annotation.setRect(rect);
annotation.setFlags(flags);
// 設定Annotation的水平對齊方式
annotation.setHorizontalAlignment(HorizontalAlignment.CENTER);
annotation.contents("Rich Text in the PDF File...");
annotation.setSubject("Subj");
annotation.setZindex(1);
annotation.setTitle("Title");

// 建立顏色對象
Color color = new Color();
color.setA(255);
color.setR(120);
color.setG(140);
color.setB(130);

// 設定註解實例的內部顏色
annotation.setInteriorColor(color);

annotation.setVertices(vertices);
// 指定註解的起始樣式
annotation.startingStyle(LineEnding.OPENARROW);

// 設定註解的結束樣式
annotation.endingStyle(LineEnding.SQUARE);

List<PolyLineAnnotation> annotations = new ArrayList<>();
annotations.add(annotation);

// 呼叫將折線註解新增至文件首頁的方法
AsposeResponse response = pdfApi.postPagePolyLineAnnotations(name, pageNumber, annotations, null, null);
assertEquals(200, (int)response.getCode());
波浪形註釋
名為 SquigglyAnnotation 的單獨類別用於向 PDF 文件添加 Squiggly 註釋。下面給出的程式碼片段可用於將 Squiggly 註解新增至雲端儲存上可用的 PDF 檔案。
// 從 https://dashboard.aspose.cloud/ 取得 ClientID 和 ClientSecret
String clientId = "a41d01ef-dfd5-4e02-ad29-bd85fe41e3e4";
String clientSecret = "d87269aade6a46cdc295b711e26809af";

// 建立PdfApi實例
PdfApi pdfApi = new PdfApi(clientSecret,clientId);

// 輸入PDF文檔
String name = "PdfWithTable.pdf";

// 從本機系統載入文件
File file = new File("/Users/nayyershahbaz/Downloads/" + name);
// 將文件上傳到雲端存儲
FilesUploadResult uploadResponse = pdfApi.uploadFile(name, file, null);

// 將會新增註解的輸入檔的頁碼
int pageNumber = 1;

// 註釋的矩形區域
Rectangle rect = new Rectangle()
    .LLX(100.)
    .LLY(600.)
    .URX(200.)
    .URY(650.);

// 指定註釋的頂點
List<Point> vertices = new ArrayList();
vertices.add(new Point().X(10.).Y(10.));
vertices.add(new Point().X(20.).Y(10.));
vertices.add(new Point().X(10.).Y(20.));
vertices.add(new Point().X(10.).Y(10.));

List<AnnotationFlags> flags = new ArrayList<>();
flags.add(AnnotationFlags.DEFAULT);

// 建立 SquigglyAnnotation 物件
SquigglyAnnotation annotation = new SquigglyAnnotation();
annotation.setName("Name");
annotation.setRect(rect);
annotation.setFlags(flags);
annotation.setHorizontalAlignment(HorizontalAlignment.CENTER);
annotation.contents("Rich Text in the PDF File...");
annotation.setSubject("Subj");
annotation.setZindex(1);
annotation.setTitle("Title");
annotation.setModified("28/05/2021 00:00:00.000 AM");

// 建立顏色對象
Color color = new Color();
color.setA(155);
color.setR(120);
color.setG(140);
color.setB(130);

// 設定註解實例的內部顏色
annotation.color(color);

// 設定註釋點
annotation.setQuadPoints(vertices);

List<SquigglyAnnotation> annotations = new ArrayList<>();
annotations.add(annotation);

// 呼叫該方法將 Squiggly Annotation 新增至文件首頁
AsposeResponse response = pdfApi.postPageSquigglyAnnotations(name, pageNumber, annotations, null, null);
assertEquals(200, (int)response.getCode());
文件附件註釋
若要新增文件附件註釋,請嘗試使用以下程式碼片段。程式碼描述與上面分享的相同,只是需要使用 FileAttachmentAnnotation 物件來完成此需求。
// 從 https://dashboard.aspose.cloud/ 取得 ClientID 和 ClientSecret
String clientId = "a41d01ef-dfd5-4e02-ad29-bd85fe41e3e4";
String clientSecret = "d87269aade6a46cdc295b711e26809af";

// 建立PdfApi實例
PdfApi pdfApi = new PdfApi(clientSecret,clientId);

// 輸入PDF文檔
String name = "PdfWithTable.pdf";

// 從本機系統載入文件
File file = new File("/Users/nayyershahbaz/Downloads/" + name);
// 將文件上傳到雲端存儲
FilesUploadResult uploadResponse = pdfApi.uploadFile(name, file, null);

// 將會新增註解的輸入檔的頁碼
int pageNumber = 1;

// 註釋的矩形區域
Rectangle rect = new Rectangle()
    .LLX(100.)
    .LLY(100.)
    .URX(200.)
    .URY(200.);

List<AnnotationFlags> flags = new ArrayList<>();
flags.add(AnnotationFlags.DEFAULT);

// 建立 FileAttachmentAnnotation 對象
FileAttachmentAnnotation annotation = new FileAttachmentAnnotation();
annotation.setName("Name");
annotation.setRect(rect);
annotation.setFlags(flags);
annotation.setHorizontalAlignment(HorizontalAlignment.CENTER);
annotation.contents("Rich Text in the PDF File...");
annotation.setSubject("Subj");
annotation.setZindex(1);
annotation.setTitle("Title");
annotation.setModified("28/05/2021 00:00:00.000 AM");

// 附件檔案路徑
annotation.setFilePath("images.jpeg");
// 附件檔名
annotation.setFileName("images.jpeg");

// 建立 FileAttachment 的 List 實例
List<FileAttachmentAnnotation> annotations = new ArrayList<>();
annotations.add(annotation);

// 呼叫該方法將 FileAttachment Annotation 新增至文件首頁
AsposeResponse response = pdfApi.postPageFileAttachmentAnnotations(name, pageNumber, annotations, null, null);
assertEquals(200, (int)response.getCode());
結論
在本文中,我們討論了在 PDF 文件中添加文字、折線、Squiggly 和文件附件註釋的步驟和相關細節。由於我們的 Cloud SDK 是開源的,您可以從 GitHub 下載完整的原始碼。該儲存庫還包含有關如何使用 Java Cloud SDK 建立和操作現有 PDF 文件的其他有用範例。如果您有任何相關疑問,請隨時透過免費的客戶支援論壇與我們聯繫。
相關文章
我們強烈建議您造訪以下文章: